


 |
| Dad's first steelhead |


|
| Dad's first steelhead |
 |
| Step 1: thread a cone onto the hook shank. Secure in place by wrapping a base of wire around the hook shank and sliding it towards the eye of the hook as far as it can go. Start the thread on the hook shank and secure the wire so it can't spin. |
 |
| Step 2: Form a "U" with the backing and secure the two ends of the backing so the "U" comes off the back of the hook shank. The backing should be 2 inches long off the back of the hook shank. (make sure the backing is secured because it will be taking a lot of pressure from the fish). Once everything is secured whip finish and apply head cement. |
 |
| Step 3: On the octopus hook, start the thread directly behind the hook eye. |
 |
| Step 4: Tie in the end of the leather on the rabbit strip on one side of the octopus hook. |
 |
| Step 5: On the other side tie in the other rabbit strip. Again, tie in the end of the hide/leather of the rabbit strip. Once the rabbit strips are secured, whip finish and apply head cement. |
 |
| Step 6: take the backing and thread the end of the "U" shape through the eye of the octopus hook. Then pull the end of the hook and the rabbit strips through the loop that is formed by the backing. When done properly it will make it so the octopus hook is attached to the backing loop. Make sure the hook point is up so it wont get snagged. |
 |
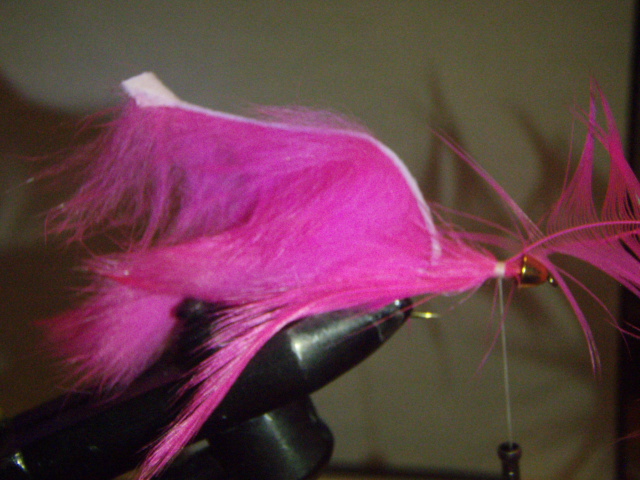
| (This is what it should look like at this point.) |
 |
| Step 7: Take the rabbit strips and pull the to the front hook. Tie both of them down even with the hook point. Clip any extra rabbit fur on the shorter rabbit strip. LEAVE THE END OF THE LONG RABBIT STRIP!! |
 |
| Step 8: Once both rabbit strips have been secure, wrap the thread to the front of the fly and apply super glue to the hook shank. Then wrap the rabbit strip around the hook shank so the leather part of the rabbit strip is on the bottom. |
 |
| Step 9: When the rabbit fur is wrapped all the way up to the front of the fly behind the conehead tie off the rabbit strip and clip the tag end. Then tie in a hackle feather at the base of the feather so the widest part of the feather is at the bottom. |
 |
| Step 10: Wrap the hackle around the fly 4-6 times so it creates an adequate collar. Once the collar has been formed tie off the hackle feather and clip the extra end of the feather. Spin dubbing around the thread and wrap 1 wrap of dubbing in front of the collar. |
 |
| Step 11: Whip finish and apply head cement. After the head cement dries, use the plies to cut/break off the hook of the first hook (NOT THE OCTOPUS HOOK) so the only part of the first hook is the hook shank. |
 |
| Step 1: start the thread and wrap towards the bend of the hook. |
 |
| Step 2: when the thread is even with the point of the hook, tie in 2 saddle hackles to each side of the fly (The hackles should be about 2 1/2 - 3 inches long off the back). |
 |
| Step 3: Tie in crystal flash to each side of the fly. |
 |
| Step 4: Tie in the rabbit strip. leave enough of the rabbit strip so you can pull it to the front of the fly so it reaches the a point about 1/8th inch behind the eye. |
 |
| Step 5: spin dubbing around the thread and make a dubbing body |
 |
| Step 6: Pull the end of the rabbit strip towards the front of the fly and tie down 1/8 inch behind the hook eye. |
 |
| Step 7: make a head out of dubbing by tying down 4 separate pinches of dubbing that circumscribe the head of the fly. (tie the pinches down in the middle and fold the tag end back towards the rear of the fly) |
 |
| Step 8: Whip finish. Manipulate the dubbing that makes the head so a shape you want and then apply head cement to not only the thread but the front of the dubbing head (this will make it so the head stays in the shape you want). |
 |
| Step 1: starting with the size 8 hook, start a thread base and tie in a piece of estaz in the back of the hook shank. |
 |
| Step 2: overtop of the estaz, tie in the rabbit fur strip. Tie it in so there is a tail off the back of the hook shank. |
 |
| Step 3: Wrap the estaz to the front of the fly. |
 |
| Step 4: on the underside of the fly, tie in a pinch of arctic fox. |
 |
| Step 5: Pull the rabbit strip overtop the fly and tie down behind the eye. Whip finish. (the back fly is now complete). |
 |
| Step 6: Thread the backing through the eye of the size 8 hook. Once the backing is thread through the eye of the hook, thread the two ends of the backing through two beads. |
 |
| Step 7: tie down the ends of the backing onto the size 1 hook shank. Make sure to secure the backing to the hook shank. After secured apply head cement to the hook shank. |
 |
| Step 8: After the head cement is dry, tie down the end of the rabbit fur strip to the shank of the size 1 hook. After the rabbit strip is secure, tie in two feathers on either side of the fly. |
 |
| Step 9: After the feathers are secured, Make a collar around the fly using raccoon finn. Make sure to leave space between the collar and the eye of the hook. |
 |
| Step 10: After the collar is complete, create a tapered head on the fly. |
 |
| Step 11: once the head of the fly is complete, whip finish and apply head cement. |
 |
| Step 1: cut a strip from a t-shit that is 4 inches long. |
 |
| Step 2: cut a 3 inch strip from a t-shirt. |
 |
| Step 3: start a thread base |
 |
| Step 4: tie in the strip of cloth and wrap it around the hook shank to give the fly more body. Tie off the strip of cloth and clip tag end. |
 |
| Step 5: fold the piece of cloth in half and tie one end down so that the crease made by the fold is on the top and the sides of the cloth cover the sides of the fly. |
 |
| Step 6: once the cloth is tied down, whip finish and clip the extra thread. Once the fly is complete the head of they fly can be colored with sharpie to add color. After the head of the fly is colored wait for the marker to dry and apply head cement. |
 |
| Step 1: slide the cone onto the hook shank and wrap wire around the shank. once the wire is wrapped around the hook shank, push it against the back of the cone to secure the cone. Start the thread behind the wire and tie down the ends of the wire. |
 |
| Step 2: Wrap the thread to the back of the hook shank and tie the middle of piece of rabbit strip down (there should be about 2" off the back and the rest of the rabbit strip going towards the eye of the hook). Once secure wrap the thread towards the eye of the hook. |
 |
| Step 3: tie in 2 saddle hackles on each side of the hook shank about 1/8th of an inch behind the cone (the hackles should be tied in so the tips are equal in length to the rabbit strip). Leave the tag end of the last hackle tied down. |
 |
| Step 4: on the underside of the fly, tie in a pinch of arctic fox. |
 |
| Step 5: once the pinch arctic fox is secured, tie the end of the rabbit strip in so the fibers are standing up. Once the rabbit strip is secured, wrap it around the hook shank one time to form a collar (make sure the fibers of the rabbit fur are standing up when forming the collar). |
 |
| Step 6: Now is when that remaining piece of hackle comes into play. Take the tag end of the hackle and wrap it around the hook shank in front of the rabbit fur collar to form a second collar on the fly. Once the second collar is formed tie off the piece of hackle and clip the tag end off. |
 |
| Step 7: Take a pinch of natural pink dubbing and spin it around the thread. Then wrap the thread 3 times behind the cone to cover up the thread work from the other steps. |
 |
| Step 8: whip finish, and apply head cement. |