This is a great pattern for swinging and it can be tied in all different color combinations. Has a lot of movement, it looks sweet and its pretty easy and quick to tie.
Hook: size 2 (any hook with a long hook shank)
Thread: grey ultra 140
Materials: Marabou, crosscut rabbit fur, hackle flash, and sculpin wool.
Tools: vise, scissors, bobbin, whip finish tool.
 |
| Step1: start a base layer of thread. Wrap the thread to the rear of the hook shank. |
 |
| Step 2: tie in a marabou tail. |
 |
| Step 3: tie in a strip of cross cut rabbit fur. |
 |
| Step 4: wrap the strip up the hook shank towards the eye of the hook. Tie off the strip 1/2" from the eye of the hook. |
 |
| Step 5: tie in a piece of hackle flash. |
 |
| Step 6: wrap the hackle flash around the hook hank to form a collar. (usually 6 wraps makes a solid collar). Tie off and clip any extra hackle flash. |
 |
| Step 7: on each side of the hook shank tie in a piece of sculpin wool. Tie the sculpin wool down in the middle of the piece so that it creates even ends on either side of the thread wrapping. |
 |
| Step 8: once secured, wrap the thread around the hook shank in front of the sculpin wool. Whip finish and apply head cement. |
 |
| Step 9: take all 4 ends of the sculpin wool and gently pull them together vertically. Using scissors cut the 4 ends at an even length. |
 |
| This is what it will look like after the 4 ends are cut when pulled above the fly. |
 |
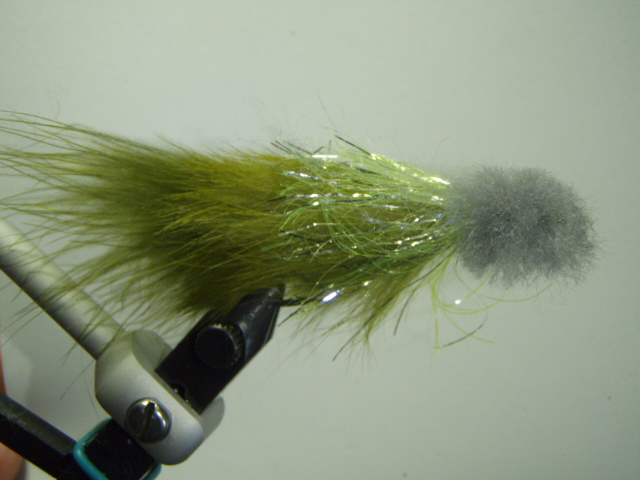
| Step 10: trim the head into whatever shape you think looks best. I like a flat bottom with a fat head but whatever works is fine. |


No comments:
Post a Comment