


Yea the river is flowing at almost 19,000 cfs and has a height close to 17 feet deep. Wow I guess you can say that the chagrin is a little blown out...
 |
| Step 1: make a base layer of thread and wrap the thread t the rear of the fly. |
 |
| Step 2: on one side of the fly tie in a grizzly marabou feather. Once it's tied in, tie in a marabou feather on top of the hook shank. (for this feather, use what ever color you are going to tie the body in). |
 |
| Step 3: on the other side of the fly tie in another grizzly marabou feather. |
 |
| Step 4: tie in pair of mono eyes in the front of the fly. wrap the thread to the rear of the hook shank and by making figure-8's tie in a pinch of EP fibers that are about 2" long. |
 |
| Step 5: after the first pinch of EP fibers are tied in, tie in 4 sili legs and then tie in another pinch of EP fibers farther up the hook shank in front of the first pinch. |
 |
| Step 6: Tie in a third pinch and after the third pinch is secured, tie in4 more sili legs and then continue to tie in pinches of EP fibers farther up the hook shank until you reach the mono eyes. |
 |
| Step 7: once at the mono eyes, whip finish. (this is what the fly should look like at this point from above). |
 |
| Step 8: using scissors clip one side into a half circle like above. |
 |
| Step 9: repeat step 8 on the other side. apply head cement down the entire middle of the fly where the thread is showing. |
 |
| Step 1: slide bead head onto the hook. make a base layer of thread. wrap thread to the rear of the hook shank. |
 |
| Step 2: tie in a pinch of crystal flash to make a tail. clip extra flash. |
 |
| Step 3: tie in a piece of copper wire in the rear of the fly. |
 |
| Step 4: tie in a piece of scud back. spin natural rabbit fur dubbing around the thread. |
 |
| Step 5: wrap thread with dubbing around the rear half of the fly. |
 |
| Step 6: fold the scud back down and wrap the copper wire overtop the scud back until it reaches the mid point of the fly. |
 |
| Step 7: wrap scud dubbing around the thread and wrap the thread with dubbing around the front half of the fly. |
 |
| Step 8: Pull the scud back overtop the front half of the fly. Clip any extra scud back. |
 |
| Step 9: whip finish and apply head cement. To make the fly more durable apply head cement to the entire back/top of the fly. |
 |
| Step 1: tie the dumbbell eyes onto the hook shank by making figure-8s overtop the eyes and around the hook shank. |
 |
| Step 2: wrap the thread to the rear of the fly. Tie in a pinch of buck tail. (this buck tail should be the darker of the 2 colors). Tie the buck tail down all the way up the hook shank right up to the dumbbell eyes. |
 |
| Step 3: once the buck tail is tied down behind the eyes, wrap the thread to in front of the eyes and pull the buck tail over the eyes and tie down. Clip the extra buck tail and wrap thread overtop the rest of the buck tail in front of the eyes. |
 |
| Step 4: wrap the thread to the rear of the fly and tie in a piece of crystal braid. |
 |
| Step 5: wrap the crystal braid up to the eyes and tie off. Clip any extra braid. |
 |
| Step 6: make slanted wraps with the thread to the rear of the fly (its hard to see in this picture because of the color but it should form a swirl. THIS STEP IS OPTIONAL it just makes the braid more secure). |
 |
| Step 7: Wrap the thread back to the eyes making a swirl. The wraps from front to back and the thread wraps from the rear to the front should form X's down the braid). |
 |
| Step 8: turn the fly over in the vise. Infront of the eyes tie in a clump of crystal flash. Clip extra. Tie in a small amount of the other (lighter) color of buck tail. clip extra buck tail. Wrap thread around the head of the fly to give it a clean look. Whip finish and apply head cement. |
 |
| Step 1: slide the bead head onto the hook. Make a base layer of thread and wrap the thread to the rear of the hook shank. |
 |
| Step 2: tie in pheasant tail to form a tail. |
 |
| Step 3: clip the extra pheasant tail that was used to make a tail. Wrap thread to the middle of the hook shank. Tie in a flashabou fibers. |
 |
| Step 4: Wrap the thread to the rear of the fly. Spin dubbing around the thread. |
 |
| Step 5: Wrap dubbing up the hook shank giving the body a natural taper. |
 |
| Step 6: take a pinch of pheasant tail and tie the ends of it down to the sides of the fly so they are on the sides of the fattest part of the body. |
 |
| Step 7: repeat step 6 but on the other side of the fly. After both sides have pheasant tail, pull the pinch of flashabou overtop the fly so that it makes a back. |
 |
| Step 8: spin dubbing around the thread and make a small collar behind the bead head. |
 |
| Step 9: Whip finish and apply head cement. to make the fly more durable, apply some head cement to the flashabou back. |
 |
| Step1: start a base layer of thread. Wrap the thread to the rear of the hook shank. |
 |
| Step 2: tie in a marabou tail. |
 |
| Step 3: tie in a strip of cross cut rabbit fur. |
 |
| Step 4: wrap the strip up the hook shank towards the eye of the hook. Tie off the strip 1/2" from the eye of the hook. |
 |
| Step 5: tie in a piece of hackle flash. |
 |
| Step 6: wrap the hackle flash around the hook hank to form a collar. (usually 6 wraps makes a solid collar). Tie off and clip any extra hackle flash. |
 |
| Step 7: on each side of the hook shank tie in a piece of sculpin wool. Tie the sculpin wool down in the middle of the piece so that it creates even ends on either side of the thread wrapping. |
 |
| Step 8: once secured, wrap the thread around the hook shank in front of the sculpin wool. Whip finish and apply head cement. |
 |
| Step 9: take all 4 ends of the sculpin wool and gently pull them together vertically. Using scissors cut the 4 ends at an even length. |
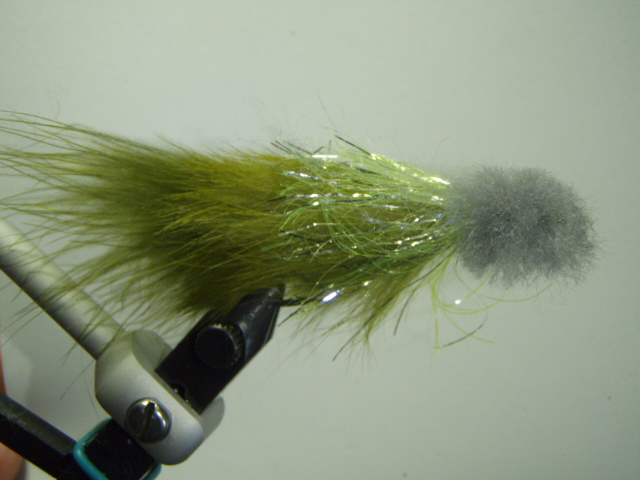 |
| This is what it will look like after the 4 ends are cut when pulled above the fly. |
 |
| Step 10: trim the head into whatever shape you think looks best. I like a flat bottom with a fat head but whatever works is fine. |