Thursday, March 31, 2011

Articulated Rubber Worm Zonker

Articulated Rubber Worm Egg Head Zonker, is way to long of a name but it's not the name that matters. If you didn't get it from the title, yes it is another one of my new rubber worm patterns and the ability to change the color with no effort by switching the color of the worm makes it a very diverse pattern. 

Rear hook: size 8       Front Hook: size 4
Thread: 8/0
Materials: rubber worm, 50 lb braid, rubber egg, crosscut rabbit fur.
Tools: Scissors, bobbin, vise, bodkin, whip finish tool.

Step 1: slide worm onto size 8 hook

Step 2: fold braid over head of fly behind the eye.

Step 3: take both ends of the braid and put them through the eye of the hook from the underside.

Step 4: pull the ends tight

Step 5: slid the worm up overtop of the braid connection. Cut the bend in the hook shank so its just the shank of the hook.

Step 6: start the thread base on the size 4 hook. tie down the braid in the rear of the fly. Put the ends of the braid through the eye of the size 4 hook and fold to the underside of the fly. Tightly wrap the braid with the thread to the hook shank so it is really secure.

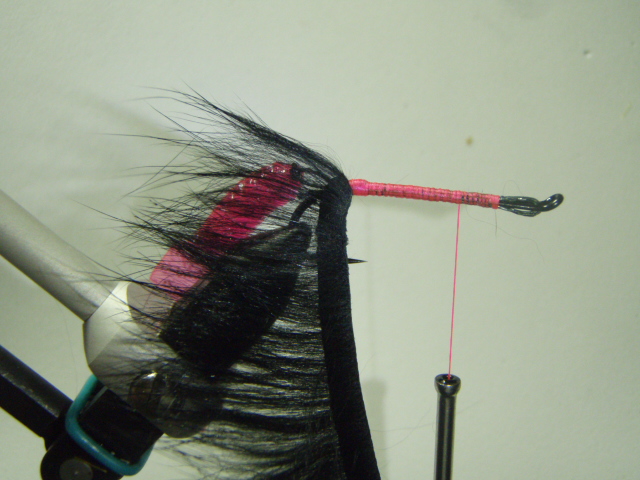
Step 7: Tie in a piece of crosscut rabbit fur in the rear of the fly and then work the thread to the front of the fly.

Step 8: wrap the cross cut rabbit fur up the hook shank to form the body of the fly. Tie off  and clip andy extra

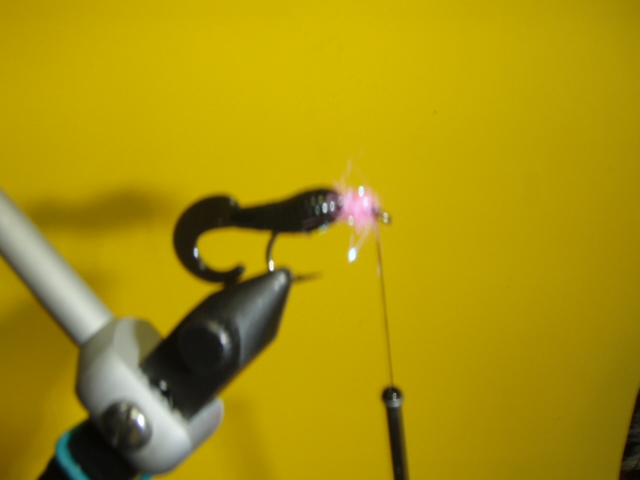
Step 9: tie in a pinch of ostrich earl (this step is optional no ostrich earl is needed). whip finish and apply head cement.

Step 10: push bodkin through the egg

Step 11: push the eye of the hook through the hole in the egg

Wednesday, March 30, 2011

New Posts

After not having the cord to connect my camera to computer, I became behind in posts, so here there are 6 new Fly Ties and some other random ones. There are nymphs, streamers and some other patterns that are innovative using new materials such as rubber worms. I'll be more consistent in posting every couple of days hopefully so enjoy and tight lines to everyone who is fortunate to go fishing.

Rubber Worms, A Purists Worst Nightmare

One of the worst things I personally believe can happen when fly fishing is to be working a run and not hooking up with the fish and only to look downstream and to see a person with conventional gear ripping fish. It may not be frustrating to everyone but it pisses me off. Not only are they ok with using conventional gear, which can be looked past, but they are catching more fish which is a problem. Anyways after reading some texts from my friend, who is unfortunately a conventional guy, about how he had caught 20 bass in a day using rubber worms out in California, I had to do something about it. So I went to a store and bought bags of rubber worms and after about an hour of tying I came up with a few patterns. Not all of them are pretty, but they look like they will catch fish.


Bead Head Soft Hackle

Soft hackles are not new fly patterns they have been around for a long time but they still work and heres a pattern that looks good and works. Enjoy.

Hook: Size 10 nymph hook
Thread: Orange ultra thread
Materials: goose biots, peacock earl, partridge feather, bead head, copper wire.
Tools: Scissors, vise, bobbin, whip finish tool.

Step 1: slide bead head onto the hook and start a thread base.

Step 2: tie in 2 goose biots in the rear of the fly so the form a "V" (I used brown biots).

Step 3: Tie in a piece of copper wire.
Step 4: tie in one piece of peacock earl. Once the peacock earl is tied in,  wrap the thread up the hook shank enough to make a tapered body, being wider towards the front of the fly.

Step 5: Wrap the peacock earl up the body leaving spaces in between each wrap so the orange shows. 

Step 6: Wrap the copper wire up the body in the opposite direction of the peacock earl. Wrap it so it crosses over the peacock earl and they form "X's" up the body. Tie off and clip extra wire.

Step 7: Using a natural colored dubbing, create a dubbing ball where you tied off the peacock earl and wire.

Step 8: Tie in a partridge feather.

Step 9: Palmer the feather to form a collar. Tie off the and clip any extra length of the feather. Whip  finish and apply head cement.

Black Worm Soft Hackle

This is one of the easiest flies to tie. Truly it is possibly the easiest fly I've ever had to tie and it works! If someone is looking for a great fly to throw for smaller fish this fly works and it doesn't take any type of split shot to get it down in a lake or pond. Made this pattern up when I was messing around with rubber worms. This pattern has been used on a lake in florida when fishing from a dock and it worked well.

Hook: Size 8 Scud Hook
Thread: Black Ultra Thread
Materials: Small rubber worm, dubbing, partridge feather
Tools: Vise, scissors, whip finish tool, bobbin.

Step 1: Slide the worm on the hook like you would when baiting a hook for bait fishing.

Step 2: Start the thread in front of the head of the worm and make a dubbing ball. I like to use a bright color to make it look like an egg or to just give it some color.

Step 3: Tie in a partridge feather and palmer it to form a collar.
Step 4: Using the thread, clean the head of the fly up. Whip finish and apply head cement.

Tuesday, March 29, 2011

Egg Head Worm

Despite the purists comments of using a worm pattern and referring to it as junk fishing, it works and it works well. worms are in a trouts diet. so tie them, use them, and love them. This is a combo of 2 of the most effective flies in fishing.

Hook: size 8 scud hook
Thread: pink thread
Materials: chenille, egg
Tools: vise scissors bobbin bodkin and a lighter

Step 1: start a thread base. wrap the entire shank in thread.

Step 2: Wrap 2 wraps around the chenille at the base.

Step 3: swirl the thread up the hook shank wrapping it over the chenille, tying it down to the hook shank.

Step 4: at the head of the fly, tie off and clip the extra chenille.

Step 5: work the thread back a little and make a small head with the thread. Whip finish and apply head cement.

Step 6: push the bodkin through the center of the rubber egg.

Step 7: remove the egg from the bodkin and push the eye of the hook through the hole in the egg. Push the egg far enough back to make enough room to tie it to the leader.

Step 8: Using the lighter, burn the end of the chenille to give it a natural taper.

Deer Hair Diver

Great pattern for bass or even some saltwater fish. Anything that will hit something on the surface will love this pattern. The deer hair floats high, and can be trimmed into a lot of shapes. This is a basic shape.

Hook: 1/0 Saltwater hook
Thread: Bass bug thread
Materials: Deer hair, Grizzly saddle hackle, crystal flash, synthetic ep fiber.
Tools: single razor blade, scissors, bobbin, vise, whip finish tool, hair stacker, pen tube.

Step 1: start a thread base

Step 2: tie in a pinch of crystal flash and a small amount of EP fiber.

Step 3: on either side of the crystal flash tie in two saddle hackles.

Step 4: On either side of the saddle hackles tie in 2 grizzly saddle hackles 

Step 5: on both sides of the fly tie in a wider hackle feather so that the natural bend of it goes outward away from the fly

Step 6: Begin to stack the deer hair. (For this fly I stack 4 pinches on top of each other). After the top is done turn the vise over and stack deer hair on the bottom/underside of the fly.

Step 7: Using a pen tube, pack the stack deer hair by sliding the eye of the hook and the shank of the hook through the center of the pen and the push. Put a half hitch in after each position or section that you stacked.

Step 8: Repeat steps 6 and 7 until you reach the eye of the hook, whip finish and clip the thread.

Step 9: Using a razor cut the underside of the fly flat and really short to give the fly the maximum amount of hook gap. Use scissors to cut the top of the fly all at an even length, then determine where you want the collar to be. Then use scissors to cut the shape of the top of the fly and use a razor to make it cleaner.

First Day On The "New" Upper Chagrin River

After the breaking of the dam, 8.5 miles of water was opened up for steelhead to run up. With time running out in my spring break, my friend and I went out on the virgin steelhead waters of the chag. The stretch we fished is one of my favorite stretches for summer smallmouth partly because of how close it is and because of my familiarity with it. You get to know a stretch of water well when you fish it at least 3 times a week in a summer. Fishing wasn't great but throwing a switch rod was amazing. That day was one of the days that it is just fun to cast a switch rod with minimal effort and watch the line fly off the water and shoot across the river. I was throwing big gaudy pink and chartreuse streamers loaded with flash because there was about 4 inches of visibility and the river was really high and fast. Great day and for other steelhead posts check out my buddies blog http://flyfishingkidchronicles.blogspot.com/.

Here are some pictures of my buddy throwing his 6 wt. Switch. Sorry about a few of the pics, my computer wouldn't flip them for some reason.